Table of Contents
How to mod the c64 mini to add extra games
Firstly, many thanks to the community members that shared their knowledge and efforts in the forum posts, to mention a few (sorry if I forgot any):
- Stuart Duncan, for sharing your initial findings on the linux-sunxi site
- JJ for your initial thread on the matter
- Chiller for your German walkthrough
- Spannernick for your English translation
- Paolo for sharing your excellent collection of 45 extra games (updated: 84 games)
You can find their posts here:
This document aims to gather the information from those threads and pool them together in one document, which can be refined further over time.
Warning
The modifications described below will no doubt void your warranty, so use your own personal judgement on whether this modification path is suitable for you.
As the modifications require some soldering and connecting of a UART converter cable, be mindful that your hardware may be damaged due to poor soldering or incorrect connections of UART pins, or the voltage level of your UART converter being set incorrectly (be sure to use 3.3V and not 5V, be sure not to mix up the RX/TX connections, be sure not to connect the power line).
Anyone choosing to make these modifications takes personal responsibility for the risks involved.
With all those ominous warnings out of the way, if you take care, read the instructions carefully, things should work out fine for you.
If you experience any problems along the way, try reaching out to users in the c64 mini forum here:
Overview
There are two preferred paths for modding at present:
- PATH A : Modding on the device: The nandb flash is modified to add the new games.
- PROS:
- Nice/convenient to have all your games built-in without needing an external USB stick
- Frees up one of your USB ports for other attachments
- CONS:
- It's a more significant change to the flash contents of the device. It might impact (or be impacted by) firmware upgrades in future.
- Some users reported a firmware upgrade wipes your added games and you will need to re-add them
- PATH B : Modding on USB stick: The nandb flash contents are copied across to a 2nd partition on your USB stick (formatted as ext4) and modified with new games there.
- PROS:
- Leaves the nandb flash in a more pristine / original state.
- You can easily switch between a modded device and original device by simply booting up with or without the USB stick, respectively.
- CONS:
- The USB stick needs to be one of the USB ports on the device, it can't be on a USB hub
- Given that your joystick consumes the other port, it makes adding more USB devices (a keyboard, extra joystick) a bit awkward.
Regardless of which path you choose, there will be some steps in common. So I'll still aim to make this a single walkthrough, which predominantly focuses on PATH A, and just inject a few aspects of PATH B along the way.
Walkthrough
I will start with Spannernick's English translation of Chiller's German walkthrough, found here:
Required hardware
- An FTDI / UART adapter (cable version allows easier connection).
Here you can find similar post with more information about it (German): THEC64 Mini modding: UART interface for serial root access

This is definitely not the cheapest one, but came quickly and works: www.ebay.co.uk/itm/PL2303HX-USB-to-TTL-RS232-COM-UART-Module-Serial-Cable-Adapter-for-Arduino-M0/302744594614 (sold out!) UPDATED - Those are approved to work too:
- USB to TTL adapter version with cable, as above
- just USB to TTL adapter
In case of using UART connection more often, opening and closing housing of Mini could become cumbersome. Some users drilled a hole in housing because of that. Instead of getting wires floating around, there could be more practical solution: to fit standard 2.5 or 3.5mm audio jack at housing. It is more elegant solution, but it require drilling of small hole and soldering panel mount jack. For that solution you will need FTDI / UART cable with audio plug, panel mount jack and short 3-pin wire.
Wire should have female pin header connector at one side; this will be attached to soldered pin header at board. Other side should be soldered to panel jack. Instead of connector, wires could be soldered directly to board. But if you do it that way, then you will need to unscrew panel board audio jack, in case that you need to put board away from housing.


- Ready made FTDI>TTL 2.5 / 3.5 mm 3 pin stereo jack cable:
- 3.5mm Stereo Panel Mount Jack:
WARNING: in any case, you need to connect (solder) only 3 wires: Tx, Rx, GND. If possible, check output voltage before soldering. It should be 3,3V, not 5V.
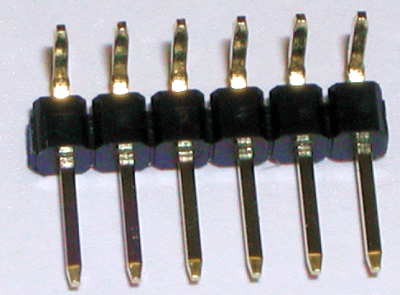
- Pin header 2.54mm RM for the UART connection on the C64 mini board (4 pins) + soldering iron (and additional accessories).
Instead of soldering, a rubber band could be used - to clamp it on without soldering. In that case use a 4 pin header that is straight (even) and aligned tightly to the board (UART adapter needs a proper connection). More about that method: http://thec64community.online/post/544/thread
Angled model is recommended, because it is always easy to hang / plug the adapter.
When soldering the 4 pin on the C64 Mini board do not leave the soldering iron on the pads too long because you could damage the traces on the board and the serial will not work,just a about 2 seconds on each pad and solder the pins on,one at a time.
- A USB stick with Fat32 and MBR partition / formatted
- A C64 mini :)
Required software
The following software is required (Intended for Windows users, Linux users should adapt it where/if needed)
- Putty (or another Terminal Program) (Putty's not needed for Linux users, although it could be used - preinstalled system terminal is more then sufficient.)
- WINVICE 2.4 (for Linux: NO SDL VICE!)
(For Linux users, some system ROMs are usually missing after install. Here is how to fix it)
- Image editing software: e.g. Photoshop / GIMP is OK, but Irfanview or Pinta is quite satisfying.
https://irfanview.com https://pinta-project.com
- A good text editor - can recommend here Notepad ++
(again, not needed for Linux - preinstalled Pluma or Kate etc is sufficient, but here are some Notepad ++ replacements)
- 7-zip to compress the VICE snapshots, to be found at
(again, not needed for Linux, it is already supported… but 7-zip works fine at *x, via Wine)
Disassembling the case
And now we can start …
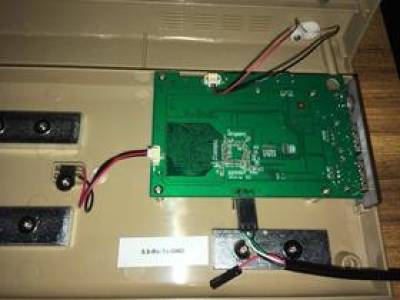
First, the C64 mini must be opened, there are 4 screws under the rubber feet. Take care when removing the cover as the cable of the LED is rather short and thin and can break easily. The cable can then be removed from the board, just as the cable that leads to the hidden button in the case - you have to be more careful because its soldered badly, so the cable can come off the button,In case, solder cable again : P
The board is held only by 4 screws on the case and can be unscrewed quickly. Then you have to solder the pins on the board and then you can screw it back firmly. You do not have to do any more.
Looks like this:
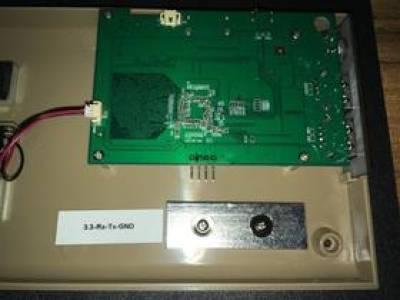
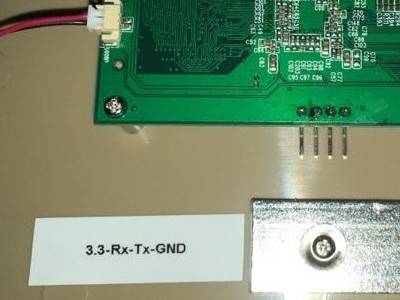
On the picture you can also see how the pins are occupied from left to right.
- 3.3V (is not needed and must NOT be connected)
- RxD
- TxD
- GND (this is the square soldering point on the board - the rightest one on picture)
Preparing your USB stick
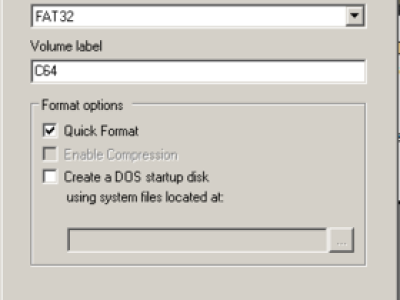
Next, it makes sense to format the USB stick first. (GParted for Linux users, probably already came with OS)
Use the downloaded tool and create a FAT32 partition:
- NOTE: For Path B (if you want your extra games on the USB stick only), you will need to create a 2nd partition formatted to ext4
- My suggested method for doing this is using a user-friendly gui-based partitioning tool called GParted
- For Linux users, you can install GParted via Software Manager or your distro's package installer utility (yum/zypper/apt-get, etc) if it is not already there, preinstalled (usually it is).
- For Windows/Mac users, you can download the bootable cd iso image version, burn it onto a CD and boot up your PC with it.
- Hopefully there are enough GParted walkthroughs online for you to figure this bit out. If there is demand for it, I can add more verbose steps here.
Now you have a stick, which is also recognised by the C64 mini.
Sets the following directories on the stick (note lower case):
+ games/
+-- games/
+-- covers/
+-- screens/
I.e. Make the directory games, then within the games directory you add the sub-directories: games, covers and screens.
Then you can connect the stick to any of the two ports of the C64 mini.
Preparing your UART converter cable
Please check for safety's sake that your UART adapter provides 3.3V and not 5V (put adapter in the PC in a USB port and use multimeter to measure the voltage between TxD and GND). The adapter should have a jumper, make sure it is set at 3.3V,not 5V and then you are ready to go.
Next, you connect the UART adapter to The C64 Mini. Connection is set like we are using our phones: one talk > other side listen, and same in the other direction. Think about it this way and you will never miss it - nor burn your hardware by accident. :)
Tx stands for transmit, Rx for receive, GND is ground (earthing):
Tx > > > > > > Rx


Rx < < < < < < Tx


GND = = = = = GND
So, connect GND to GND, RxD to TxD, TxD to RxD and now dedicate yourself to the Putty software. This is a simple .EXE where nothing needs to be installed, just start it. First select Connection Type Serial and then you will be using Serial Line
Preparing your Comms Software
Windows
The COM port of your adapter (COM1, COM2, …. COM9) and Speed 115200. Under “Devices and Printers” you can see what kind of COM port the adapter uses ,port.
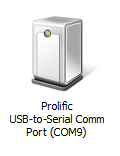
In my case it is port COM9 … Attention, if you later use another USB port then the COM port will change.
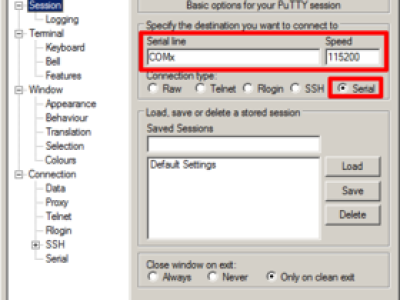
Next you go down to Serial.
Enter the remaining data there. it should already say Serial Line and Speed from before.
- Data Bits = 8
- Stop Bits = 1
- Parity = None
- Flow Control = None
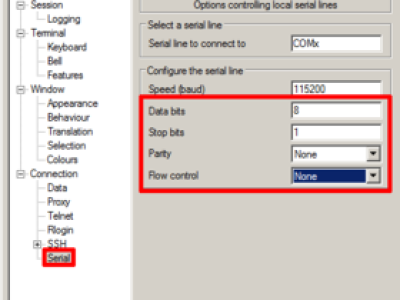
Then go to Open and should get a blank black terminal window with a green cursor in the corner.
Linux
Here is much more detailed walkthrough: http://linux-sunxi.org/UART - if you stuck, check it there.
Open terminal, hook up your USB UART adapter cable if you didn't already.
dmesg to see to which tty your UART is connected to (usually ttyUSB0). It should be at the end, probably the very last line of long listing
(dmesg | less to scroll through the output). Alternatively, check syslog at /var/log.
Let's start.
stty -F /dev/ttyUSB0 -crtscts (this is to turn off hardware flow control - the cable has no wires for that)
Most common way for serial connection is to use “cu” utility (usually preinstalled). Enter:
cu -s 115200 -l /dev/ttyUSB0
if you get “permission denied”, try again with sudo:
sudo cu -s 115200 -l /dev/ttyUSB0
If it is still denied, for Ubuntu / Linux Mint you have to enter
sudo usermod –append –groups dialout myusername, then log out and log in again (replace “myusername” with your own username).
From now on it should work, without sudo.
For other distros, check troubleshooting dedicated section from link above.
Getting into the U-boot prompt
The c64 mini does not need to be connected to a TV or monitor, you only need Putty (at Linux: cu) to connect to it, and UART of course.. :)
The next step is a bit awkward because you have to do 2 things at the same time. The easiest way to ask a friend in the household shortly for help (to press a key on the keyboard “s”). Or you do it yourself somehow …
You must now have selected your terminal window and hold down the “s” key on your PC keyboard and then supply the C64 mini with the micro USB plug with power. This stops the boot process of TheC64 mini. Remember, as soon as the UART adapter connected to the mini you can no longer use the power button to turn it off / on. If it did not work the first time, you just have to unplug the power, plug in again. and repeat it again.
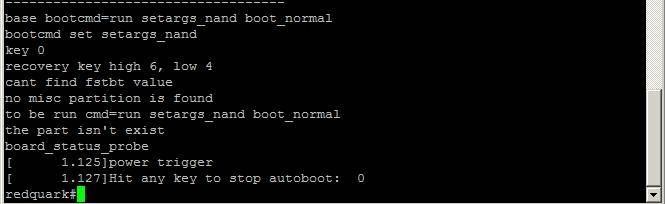
How can I tell if it worked?
If you end up with the following message, then it has not worked.
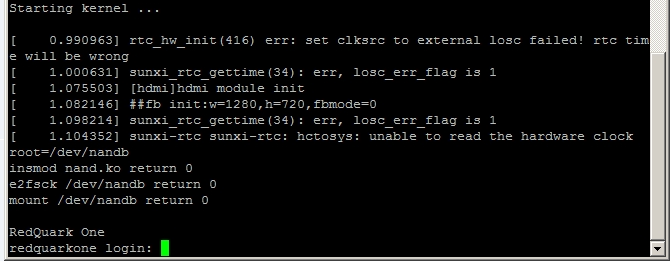
If you see this message, then it worked.
Setting the root password
Now you need the root login and set your own password. Then you can also log in without interruption on the c64 mini as root.
Mind you, while waiting for new password, cursor will disappear: it will not blink, nor you will see what you type. it is common security measure of Linux (and most other Unixoids). Your machine is not frozen. When you press enter, “Retype password:” will occur - retype it, press enter and continue.
Hint: commands that needs to be entered to terminal could be copy&pasted line by line from below. ctrl+c is keyboard shortcut for “copy” at Windows and Linux; ctrl+v is “paste” for Windows, ctrl+shift+v for paste into Linux terminal. alt+tab is for switching between windows at Windows and Linux, as usual.
Here is what you need to do, step by step:
setenv console ${console} ramfsbootinsmod /lib/modules/3.4.39/nand.komount /dev/nandb /mntpasswd- (Type in a password ) [ The cursor does not move, the input is masked]
- (confirm password again) [ The cursor does not move, the input is masked]
mv /mnt/etc/shadow /mnt/etc/shadow.oldcp /etc/shadow /mnt/etcumount /mnt
UPDATE: “setenv console ${console} ramfs” is used instead “setenv nand_root /dev/sda”; both works, but according to this post at community forum, this is better way to do it:
“instead of doing the 'setenv nand_root /dev/sda' a better way is to do 'setenv console ${console} ramfs'. This uses the 'official' way supported by the boot script to get to the command prompt instead of failing to mount the root disk. It adds the 'ramfs' parameter to the boot arguments (by adding it to the console parameter which in itself gets added to the bootargs paramter). If the boot script sees this 'ramfs' paramter it will stop and not try to mount and run from the nand_root.” (thanks jj)
Other variant is left below, for historical reasons.
Here is the entire text
redquark # setenv nand_root /dev/sda


redquark # boot


read boot or recovery all


[48.085] sunxi flash read: offset 1000000, 11549075 bytes OK


[48.100] ready to boot


[48.103] [mmc]: MMC Device 2 not found


[48.107] [mmc]: mmc not find, so not exit


NAND_Uboot


Exit


NB1 : NAND_LogicExit


[48.111] Starting kernel …


[0.991847] rtc_hw_init


(416) err: set clksrc to external losc failed! rtc time wants to be wrong


[1.001419] sunxi_rtc_gettime (34): err, losc_err_flag is 1 [1.076451]


[hdmi] hdmi module init


[1.082448] ## fb init: w = 1280, h = 720, fbmode = 0


[1.099610] sunxi_rtc_gettime


(34): err, losc_err_flag is 1


[1.105737] sunxi-rtc sunxi-rtc: hctosys: unable to read the hardware clock


root = /dev/sda


wait /dev/sda ready


wait /dev/sda ready


wait /dev/sda ready


wait /dev/sda ready


[4.953983] sd 0: 0: 0: 0: [sda] No Caching mode page present


[4.960123] sd 0: 0: 0: 0: [sda] Assuming drive cache:


/ # insmod /lib/modules/3.4.39/nand.ko


/ # mount /dev /nandb/mnt


[65.852040] EXT4-fs (nandb): could not mount as ext3 due to feature incompatibilities


[65.944133] EXT4-fs (nandb): could not mount as ext2 due to feature incompatibilities


/ # passwd Changing password for root


New password: (type in password)


Retype password: (type password again)


Password for root changed by root


/ # mv /mnt/etc/shadow /mnt/etc/shadow.old


/ # cp /etc/shadow /mnt/etc


/ # umount /mnt


/ #
Then restart the C64 mini and log in with login : root and the password you set. Now you have root access to the c64 Mini :)
Useful hints
When you enter Mini's file system, you will find your self at mounted /root sub-folder, not a real root!
It could be confusing, because ls will not show you common file-system “tree”.
To quickly get out of it, type
cd ..
To see where are you at file system, enter this to show you more informative command line prompt:
PS1=“\w $ ”
Linux login/logout - quick reminder of session procedure
stty -F /dev/ttyUSB0 -crtscts
cu -s 115200 -l /dev/ttyUSB0
login (root), password
mount /tmp/usbdrive/sda1 /mnt
mount -o remount, rw /
DO WHAT YOU NEED, THEN
mount -o remount, ro /
umount /mnt
poweroff
Midnight Commander
For easier and faster manipulation with files and browsing through Mini's file system, using of MC is recommended.
This is dual panel file manager, in style of “Total Commander / Windows Commander”, “Double Commander”, “Norton Commander” (DOS) or “File Manager” of old Windows version (WfW3.11).
It is recommended to utilise “learn” abilities of MC, to adjust MC to Mini's keyboard assignment and, more importantly, adapt yourself to using MC commands (function keys, mostly). More about it at community forum: http://thec64community.online/post/2332/thread
Quick procedure:
- Download MC here, put it at USB stick
- connect Mini usual way (procedure above), if you didn't already
- FIRST BACKUP YOUR NANDB (see below how), if you didn't already
zcat /tmp/ramfs/midnight\ commander.cpio.gz | cpio -i
mc to start MC. F10, alt+0 or esc+10 to exit (F10 usually don't work, initially).
Reminder and useful tips for using MC here and here (from community forum link, right above)
Backing up NAND memory and existing games
Next, I would first make a backup copies of the Nand memory and the whole games on the USB stick. You never know if you :) need it later If you need about 210MB of free space on the stick … ^^
Since the guys from Retro Games fiddled with the mount standard, the USB stick has to be integrated a bit differently. As root you are already logged in, enter now the following:
- mount /tmp/usbdrive/sda1 /mnt
Then you copy the nand parts to the USB stick with:
- cp /dev/nand* /mnt
and now the games files:
- cp /usr/share/the64/games/*.tsg /mnt/games/
- cp /usr/share/the64/games/games/* /mnt/games/games/
- cp /usr/share/the64/games/covers/* /mnt/games/covers/
- cp /usr/share/the64/games/screens/* /mnt/games/screens/
and which joysticks are all supported copies the following txt file:
- cp /usr/share/the64/ui/data/gamecontrollerdb.txt /mnt
Then unmount the USB stick with:
- umount /mnt
Now “shut down” the C64 mini with
- poweroff
and unplug the power plug again.
Now you can unplug the USB stick and plug it into your PC and copy the backed up files for backup somewhere else.
- nanda: Linux kernel
- nandb: root filesystem, ext2 format
- nandc:? probably additional memory, contains nothing.
- gamecontrollerdb.txt
- Game files in the games directory
So much for root first and make backups.
Extra steps for Path B
For Path B (if you want your extra games on the USB stick only), you need to do the following steps also:
- plug the USB stick into my c64 mini
- power up the mini
- log in as root
I'll now focus on the extra steps on page 7 of this forum thread:
- Make the root path writable with:
- mount -o remount,rw /
- Create a new folder to mount this 2nd partition later on
- mkdir /mnt2
- Make a backup of “/etc/fstab” as follows:
- mount /tmp/usbdrive/sda1 /mnt
- cp /etc/fstab /mnt
- umount /mnt
- Edit “/etc/fstab”, adding the bolded lines (I'll use “vi /etc/fstab” to make the edit. If vi editor is too uncomfortable for you, maybe JJ's cat method from the forums will work better for you, I can add it here later if it's preferred):
# <file system> <mount pt> <type> <options> <dump> <pass>


/dev/root       /          ext2   rw,noauto 0      1


/dev/sda2       /mnt2      ext4   rw,nofail 0      0


/mnt2/usr/share/the64 /usr/share/the64 none bind,nofail 0 0


/mnt2/var/lib/the64 /var/lib/the64 none bind,nofail 0 0


proc           /proc       proc   defaults  0      0


devpts         /dev/pts    devpts defaults,gid=5,mode=620 0 0


tmpfs          /dev/shm    tmpfs  mode=0777 0      0


tmpfs          /tmp        tmpfs  mode=1777 0      0


tmpfs          /run        tmpfs  mode=0755,nosuid,nodev 0 0


sysfs          /sys        sysfs  defaults  0      0
- Add an “/etc/init.d” startup script to ensure the directories are mounted:
  cat >/etc/init.d/S98mountusb
  #!/bin/sh
  mount -a
  <CTRL>-D

  chmod a+x /etc/init.d/S98mountusb
Ok then, I guess we're done with the steps, so maybe I should now power down:
poweroff
copy the contents of nandb over to your 2nd partition on the USB stick with this command:
- dd if=/dev/nandb of=/dev/sda2
What do I need now to add a game to the c64 mini?
- A game config file in the format PLAYNAME.tsg that contains the game title, a description in several languages (you do not need it all), div other game info and game cover settings, screenshots, and joystick settings. This file is always located here: /usr/share/the64/games
Uses the Notepad ++ and not the normal Notepad (if you open a tsg file you see the difference * g *)
The .tsg file is quite self-explanatory, just copy it and edit it to the game you want to make,to add a new game,the .tsg file is just a .txt file.
Joysticks
The only important thing in it are the joystick settings. However, the line (or 2 lines in 2 joystick games) is always structured as follows:
J1 (*) / 2 (*): JU, JD, JL, JR, LEFT trigger, RIGHT trigger, LEFT shift pad, right shift pad, Y, B, A, back (= BACK / SELECT button), X
At each position,You always have to fill in what the joystick buttons should do and what keys on the C64 Mini keyboard they press.
Shortcuts are:
- JF = JOYSTICK FIRE / FIRE KEY
- F1 … F8 = F-keys
- RS = RUNSTOP
- SP = SPACE / SPACEBAR
- EN = ENTER / RETURN
- or letters / numbers
The first 4 directional abbreviations (JU, JD, JL, JR) can also be lettered, for example, to play old games that support only keys for control. The best example is probably Frogger ;)A joystick line could look like this:
J: 2 * : W, S, A, D, Y, N ,,, F ,, S, F1, JF
- W, S, A, D on the Dpad
- Y, N on the triggers buttons L / R
- F on Y button
- S again on A button
- F1 on Back or Select buttons
- FIRE on X button
keys that are not used do not have to be mapped either, but the row must always have the 13 variable size after the colon, separated by commas.
Adding games
- A game-cover in the format 122×175 as .png file, which is then located here:
- /usr/share/the64/games/covers
- Game-Screenshots in the format 320×200 as .png file, color depth But it does not matter 256 colors, since still reasonably recognizable and does not need so much space, can be found at:
- /usr/share/the64/games/screens
Use it for the image editing software of your choice or eg the Irfanview, so you can actually do everything (zoom in, cut, change color depth, us.w.)
- The game itself, as a compressed VICE snapshot at:
- /usr/share/the64/games/games
Use the WINVICE 2.4 version. I will not go into how to use VICE, but there are enough forum posts and help and most of them may already know it better than me. ;)
The snapshot created must then be re-packed into a gzip archive with 7-zip (PLAYENAME .vsf.gz).
Make sure you have all the files on your USB stick in the games directory and you can look in there.
For example, I created a games.new directory on the stick and also created the directories games, covers, screens there. Everything I re-create, I pack in there and not in the directory with the already installed games of Retro Games. So you do not accidentally delete or overwrite something.
“short” checklist
- SPIEL.tsg (in “games.new/”) SPIEL
- SPIEL-cover.png (in “games.new/covers/”)
- SPIEL-00.png, SPIEL-01.png (in “games.new/screens/”)
- SPIEL.vsf.gz (in “games.new/games/”)
If you have all this together, then you can stick the USB stick with the files to the C64 mini and setup the serial and connection with the UART adapter and click on Putty. After that, you just have to copy your files to the C64 mini.
- Log in first as root.
- Mount the USB stick:
- mount /tmp/usbdrive/sda1 /mnt
- The root drive is mounted as READ-ONLY, you have to change it to be able to write to it:
- mount -o remount, rw /
- Then copy Your files from your stick to the root drive:
(-i causes it to ask beforehand if it should overwrite a file, sometimes wanted or not)
(-f, for example, causes it to overwrite without prompting)
(-r would be directory with Copy subdirectories but I prefer to have a little more control and do it one by one.)
(Type only cp (copy command) will show a help text of what options you can use.)
- cp -i /mnt/games.new/*.tsg /usr/share/the64/games/
- cp -i /mnt/games.new/covers/* /usr/share/the64/games/covers/
- cp -i /mnt/games.new/games/* /usr/share/the64/games/games/
- cp - i /mnt/games.new/screens/* /usr/share/the64/games/screens/
- After copying, put the root drive back in READ-ONLY state:
- mount -o remount, ro /
- And unmount the USB stick with:
- umount /mnt
Last with poweroff shut down the C64 mini and unplug the power plug again.
Now you can screw the C64 mini back together (I have my own, always open in the meantime), Now you can turn on the C64 Mini, switch on your TV and hopefully enjoy one (or more) new game (s) on it.
Wish you a lot of fun and success :wave your hand:
Marcel (Translated, some words changed by Spannernick. Wikification and further refinements by Gurce, Crispin)
Changing the carousel music
Thanks to Paolo for these steps, provided in his “addgames.txt” file:
If you want to change to carousel music you have to swap the “menu.wav” file. First you need a new wav file with the music you want. Note that wav file must be MONO, 22050 Hz, 16bit. I made “ocean.wav” by myself with Audacity in Windows.
- mv /usr/share/the64/ui/sounds/menu.wav /usr/share/the64/ui/sounds/menu.old
- This will rename the actual “menu.wav” file to “menu.old”
- cp /mnt/ocean.wav /usr/share/the64/ui/sounds
- This will copy “ocean.wav” from mounted PenDrive to internal folder
- mv /usr/share/the64/ui/sounds/ocean.wav /usr/share/the64/ui/sounds/menu.wav
- This will rename “ocean.wav” to “menu.wav”